recipe
Showing posts with label recipe. Show all posts

Taco Stuffed Bell Peppers using the Freshest Ingredients from Florida

Friday, April 20, 2018

4 comments
This post was sponsored by Fresh From Florida as part of an Influencer Activation for Influence Central, however, all opinions expressed are my own. 

Who says tacos are just for Tuesdays?  Tacos are perfect for any day of the week in my opinion, especially when you replace the shell with a bell pepper!  I'm always looking for healthy recipes and ways to incorporate fresh and local ingredients into our week night meals that my entire family will love.  As a mom of two toddlers and two on the way, that is very important to me.  I mean, if you're a mom then you know how picky toddlers and kids can be.  Am I right?


We tried our hand at Taco Stuffed Bell Peppers with (non-spicy) Corn Salsa and it did not disappoint.  I absolutely love that 90% of our dinner was made from the freshest ingredients, Fresh from Florida.  It makes me feel really good that I am able to give my family healthy options that don't have to be boring or bland and are full of color.  The brighter the colors, the more likely my two little girls are to eat it; that and of course, anything with corn.  Ha!  

The best part is I can find all of this wonderful local produce at my nearest Publix.  It's nice that I don't have to go far to find and get fresh, local ingredients for my meals grown right here in Florida.
 

Now, onto the good stuff....the recipe!  These Taco Stuffed Bell Peppers are so easy to make, especially when you are a mom of toddlers and/or just looking for a quick week night meal.  It's little prep and the end result is fresh and delicious!  The Florida bell peppers, tomatoes, corn and red onion come together so well and will leave your taste buds singing.  There really is something special and flavorful about ingredients that are not processed and Florida farmers make it easy for everyone to eat fresh produce year-round.

I omitted the hot sauce in the corn salsa so my girls could eat it, but added it in on my plate.  You could even add fresh minced jalapenos for an extra kick!

  
Be sure to #followthefresh and try it for yourself!

You can find the original the original recipes here:


Taco Stuffed Florida Bell Peppers
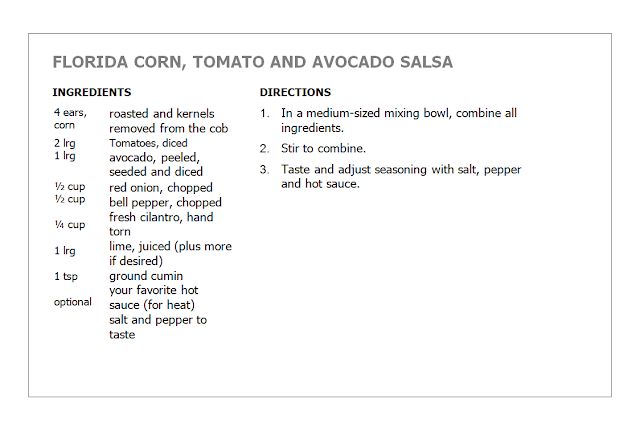
Florida Corn, Tomato and Avocado Salsa

You can find other delicious recipes from Fresh from Florida here featuring Florida fruits and vegetables and to watch easy how-to videos for quick and healthy recipes.  Be sure to follow Fresh from Florida on social media as well.
Twitter
Instagram
Pinterest

Read More

Southern Holiday Memories + the Best Salted Caramel Pecan Pie

Sunday, December 24, 2017

No comments
This post was written in partnership with Southern Kitchen.  As always, opinions are 100% honest and my own.

There is nothing like the holidays to bring back memories of your childhood.  The smells, the traditions and of course, the food.  Especially my favorite-dessert....pecan pie!

My grandmother has a pecan tree in her back yard and I remember growing up and getting excited about going over and helping her pick pecans.  We would get to crack them open, sneak a couple in my mouth and the rest would go to making some yummy, southern dessert recipes like divinity, fudge and my still to this day favorite, pecan pie.


I was able to make the trip from Florida to Texas this year to visit my family for Thanksgiving and one thing I knew, was that I was going to help my grandmother make pecan pie and this time my two little girls could join in on the fun!  It was a blast watching them help her pick pecans like I used to with her.

Watching my girls bond with their great-grandmother and love on each other was definitely the best part.  When we got ready to head back to Florida, my grandmother gave us two huge bags full of pecans to take home.  I have been backing like crazy for Christmas and decided to put a listed Southern twist on our traditional pecan pie recipe this year.

Y'all, I have made this Salted Caramel Pecan Pie THREE times already within the month.  It is delicious, gooey and full of pecans (from Texas).  You are going to love it and it's the perfect dessert if you still can't decide what to make.


One of my favorite things about baking, other than the memories, are the beautiful bake-ware that I can find.  I came across Southern Kitchen and fell in love this pie dish.  I love the white, but it comes in different colors and the handles are such a great touch.  I've really been obsessing over all of Southern Kitchen's bake-ware, but this pie dish has been my favorite so far.  I definitely thinks the Salted Caramel Pecan Pie helps ;)

Be sure to sign up for Southern Kitchen’s emails to receive special deals, recipes, entertaining tips from Southern Kitchen.  You can also use coupon code 'Welcome10' for $10 off your first purchase of $50 or more!


Merry Christmas!!
Read More

The Perfect Snack for Holiday Gatherings

Friday, December 1, 2017

8 comments
This is a sponsored conversation written by me on behalf of Pagoda®. The opinions and text are all mine.


I love hosting get togethers at my house during the holidays.  From Friends-giving and Favorite Things Parties to easy Asian inspired dinners, it's something that both my husband and I enjoy doing and have been doing since we starting dating almost 6 years ago.

A huge part of those gatherings are, of course, the food!  Sometimes I love going all out and making things from scratch, but sometimes I find a great deal at Publix that I just can't pass up; like these Pagoda® Vegetable Egg Rolls and Pagoda® Pork Potstickers.


Right now, Pagoda products are part of the Publix digital coupon deals and you don't want to miss out on this. 

Now, if you caught my last post, then you know that I'm doing a little something called "No Cook November" and I haven't cooked all month.  One freezer meal that I went to when having company last week was chicken fried rice.  It was the perfect meal for all of us and the Pagoda Vegetable Egg Rolls and Potstickers took our meal to another level!

The Pagoda snacks were easy to prep, which meant I could continue with my "No Cook November" plan by just putting them in the oven to warm up.  They're made with fresh-cut veggies, from-scratch wrappers, and 100% white meat chicken.  It takes just 20 minutes to go from freezer to plate.  Super easy!  They came out hot, crunchy and delicious.  Seriously, my 3 year old ate two egg rolls and the pot stickers were gone in minutes!


Made with no MSG, no certified artificial dyes, no trans fat, no PHOs, no high fructose syrup and no preservatives, I feel good about snacking on them and will definitely add them to future gatherings just for the Sweet Chili Sauce alone. So good!

You can find Pagoda products in the freezer aisle at your local Publix.  Don't forget that right now you can also get $1 off using Publix digital coupons.  You are definitely going to want to add these on your holiday grocery list this year!


Read More

NO Cook November + what we've been up to

Tuesday, November 14, 2017

No comments
These last few months have seriously flown by faster than I thought they would.  I haven't blogged (with the exception of yesterday's post) in almost a month.  The reason for that has been on purpose.  I think it's important, at least for me, to take a break from posting every now and then.  If I'm being honest, since my miscarriage in late July, I had been trying to keep us all busy.  It finally caught up with me and I needed some time to focus on other things and really find balance again with my day to day.

Part of that being spending a couple of days making some of my favorite freezer meals.  I have officially gone 14 days without cooking, with the exception of the occasional macaroni and cheese for my girls and throwing corn dogs in the oven for my daughter's 2nd birthday party last weekend.  I am calling it No Cook November and it has been amazing!  I plan on making a list of what's on our menu this month in another post soon :)

Here's what else we've been up to since my last post in October

My husband left out of state for work for a week, so it was fun and mostly exhausted having Mommy and Daughter(s) time.  We spent half a day at the Glazer Children's Museum in Tampa with some friends and then I came home and made a delicious vegan meal for all of us.  I'm not a vegan, but this recipe is really good.  My youngest was shoveling it in her mouth!


We had a super fun Halloween Art in the Park with my local mommy group and went to Busch Gardens.  Busch Gardens is easily becoming my girls favorite thing to do and I love that they are big enough to ride the rides.


I got to enjoy a night out with a friend when my husband got back home.  We went to the Junior League of St. Pete's Fashion Show and had a blast!


I've been able to catch up around the house the last few weeks and really enjoy hanging out with my girls!  We even celebrated my youngest daughter's 2nd birthday last weekend a little early (I can't wait to share those details with you)!
 
Minnie Mouse & Daisy Duck-Halloween 2017

Marvel Universe Live Blog Event with She Just Glows
Charlotte's Carnival Birthday Party
Thank you to everyone who continues to read my blog and follow my little family even after we go a little MIA!
 
Read More

How I Save at Publix + Creamy Alfredo Garlic Chicken Pizza

Thursday, October 5, 2017

12 comments
This is a sponsored post written by me on behalf of RAGÚ® Pasta Sauce.  All opinions are entirely my own.


There are a lot of things that make me happy, but Thursdays and saving money are two things that are at the top of my list.  I look forward to Thursdays because that is when the new Publix shopping ad comes out and that means new BOGO (buy one get one free) offers!  I get so excited about this and can't wait to create my meal plan and grocery list for the following week.

I have a couple of days to plan it out since I do my grocery shopping on Sunday afternoons.  It's so much fun to see how much money I can save and the deals I can get on some of my favorite products, including RAGÚ® Pasta Sauce, which goes BOGO now through Wednesday, October 11th.   

I love how easy Publix makes it to plan my meals for the week and this week I will be making Creamy Alfredo Garlic Chicken Pizza using RAGÚ Cheese Creations Classic Alfredo Pasta Sauce.  My toddlers can be a bit picky sometimes, but they love this!  It's seriously a big hit in our family.

RAGÚ Cheese Creations Classic Alfredo Pasta Sauce now comes in family size, so I can make an additional pizza to freeze. Mom Win!

What you'll need:


Start with your dough.  Sprinkle flour on a flat surface and roll out your dough.  It's best at room temp.  I love that I can just grab this at my local Publix and it's ready to go!


Mix together the RAGÚ Classic Alfredo Pasta Sauce with parsley and spices.  Spread evenly over the dough.  This makes the perfect white pizza sauce because it is thick, creamy and packed with Parmesan and Romano cheeses full of flavor!  It is made with real cheese and fresh cream.  It can be found on the pasta sauce aisle at Publix and comes in 16 oz. or 21.5 oz family size jars.


Now, my favorite part...adding the toppings.  Sprinkle shredded chicken and cheese over the sauce.  This would also be great with spinach layered on the bottom and I added red onions to the top.  My girls will eat any vegetable if it's baked into a pizza.

{Mom hack --> Cook 3-4 chicken breasts on low in a crock-pot.  Use a hand mixer to shred the chicken when cooked through.  You'll have chicken on hand for easy week day meals or you can freeze for another time!}


Bake at 375 for 25-30 minutes!  I'm not going to lie, as soon as I finished taking photos, I inhaled two slices of this pizza in record time.  So good!


Read More

There is Always Time for Family and Food | Nacho {bar} + DIY Corn Chips tutorial

Friday, September 22, 2017

11 comments
This shop has been compensated by Collective Bias, INC. and The Coca-Cola Company, all opinions are mine alone. #ServeWithACoke #SoloConCocaCola #CollectiveBias


This month is Hispanic Heritage Month and I instantly think of my abuela and everything she has taught me, especially cooking.  My love for cooking comes from her.  She is the one who taught me how to cook when I was a little girl and still continues to teach me new recipes.  She is always in the kitchen cooking for the ones she loves and I've grown up to be the same way.  It has taken me years to "perfect" some of her Mexican recipes and although they will never be as good as she makes it, I'm not doing too bad.

Growing up with a Mexican family, I remember my childhood being a blast every time we got together and I remember we always made time for each other.  Our gatherings were loud, crowded and filled with love and a lot of amazing food.  

My abuela has 7 kids, 23 grand-kids and 39 great-grandchildren and that isn't including spouses.  I hope that gives you an idea of what our cook-outs and holidays looked like.

Since I did learn the majority of my cooking from my grandmother, I learned to cook big meals.  When I say big, I mean meals that could feed my little family of 4 for days.  So naturally, I love cooking for crowds, especially when it comes to Mexican food and sharing my Mexican culture with others. 

She also taught me that there is always time for family.  Since I don't have any family in Florida, I've made some great friends who I consider family and this week I was able to share an easy meal that fed all of us.  A nacho bar was just what this week called for after returning from our evacuation due to Hurricane Irma.  We all sat around, caught up on how we are doing and shared a cold Coca-Cola™ together.


The cold Coca-Cola and the spicy homemade salsa hit the spot.  Coca-Cola was always a treat growing up.  It wasn't something that my mom kept in the house, but I could always count on it being at our family gatherings. There is just something about it that brings back old memories and it continues to be a part of new memories.  I love that I was able to share a few of my favorite recipes and drink with my "framily".
   

This week I actually should have been spending time with my abuela, but our plans changed because of the storm.   This get together was a nice reminder of everything she has taught me over the years.  The spices and flavors took me back!  I even made homemade corn chips using Guerrero corn tortillas!  They were delicious and so easy to do that I've included a tutorial below and a printable for your own DIY Nacho Bar.  Do you have certain foods that take you back to your culture or your childhood?

Head here to find more recipes to Serve with a Coke!


"PANZA LLENA CORAZÓN CONTENTO"

Enjoy! (Recipes below)
 

Recipes
Corn Chips:
  • Olive Oil
  • Salt
  • Guerrero Corn Tortillas
Lightly brush oil on corn tortillas.
Cut in triangles.
Place on baking sheet.
Bake at 350 for 10 minutes or until toasted and crispy.

Homemade Salsa:
  • 2-3 jalapenos
  • 1 medium onion
  • 1 can diced tomatoes
Boil onion and jalapenos until soft.
Place all ingredients in blender.
Blend until desired consistency.
Add salt. 

Mexican Street Corn Dip:
  • 2 tbsp butter
  • 4 cups corn
  • 1 jalapeno (seeded and diced)
  • 2 tbsp Mayo
  • Juice of one lime 
  • 2 tbsp chili powder
  • 2 tbsp fresh cilantro
  • 1 garlic clove (pressed)
  • queso fresco 
Melt butter on medium heat.
Add corn and jalapeno. Cook until slightly charred.
Stir in additional ingredients.
Serve immediately.

Homemade Taco Seasoning:
  • 2 tsp paprika
  • 1 tsp black pepper
  • 1 tsp salt
  • 1 tsp onion powder
  • 2 tsp garlic powder
  • 2 tsp cumin
  • 4 tsp oregano 
  • 3 tbsp chili powder 
Mix together.
Read More

Playdates + Pumpkin Cinnamon Rolls

Monday, August 28, 2017

13 comments
We all know that play dates are really for the moms and the best ones are filled with catching up, lots of laughter (from the moms and the toddlers), coffee and pastries.  Okay, the pastries might just be me, but regardless, I think you would agree they are a bonus.  

Last week I had the urge to bake and really wanted to try out this new Pioneer Women recipe I had come across.  Of course, I never check to make sure I have everything that I need and halfway through, realized I was short on a few things.  I improvised (like I usually do) and I was more than pleased with the way that the Pumpkin Cinnamon Rolls turned out.   They were moist, you could taste all the spices and the icing was ooey-gooey goodness.


I invited a friend and her son over to indulge in the sweet treat aka second breakfast with us and to let the kids run off the sugar afterwards ;)  The girl time and the pumpkin cinnamon rolls were just what I needed.  Although, I think it did make me more ready for Fall.  Only 26 more days!

I love sharing recipes with y'all, so I hope you enjoy this one.


print recipe

Pumpkin Cinnamon Rolls
(with Chocolate Chips, Pecans and Cream Cheese icing)
Ingredients
Dough:
  • 1 1/2 cups Whole Milk
  • 1/2 cup Vegetable Oil
  • 1/2 cup Sugar
  • 1 package (2 1/4 teaspoons) Active Dry Yeast
  • 1 cup Pumpkin Puree
  • 3 cups All-Purpose Flour
  • 1 cup Whole Wheat Flour
  • 1/2 teaspoon Ground Cinnamon
  • 1/4 teaspoon Ground Nutmeg
  • 1/4 teaspoon Ground Ginger
  • 1/2 cup (additional) Whole Wheat Flour
  • 1/2 teaspoon Baking Soda
  • 1/2 (heaping) teaspoon Baking Powder
  • 1/2 teaspoon Salt 
  • Filling:
  • 1/2 cup (1 stick) Butter (melted)
  • 1/2 cup Sugar
  • 1/2 cup Brown Sugar
  • 1/2 teaspoon Ground Cinnamon
  • 1/4 teaspoon Ground Nutmeg
  • 1/4 teaspoon Ground Ginger
  • 1/2 cup Mini Chocolate Chips
  • 1/2 cup Pecans (chopped)
  • Frosting:
  • 8 ounces Cream Cheese (softened)
  • 2-3 cups Powdered Sugar
  • 1/4 cup Whole Milk
  • 1 teaspoon Vanilla Extract
Instructions
Dough: In a large pot, combine whole milk, vegetable oil, and sugar. Heat until hot (not boiling), then remove from stove and allow it to cool slightly. Sprinkle the yeast over the mixture and let it sit for 5 minutes. Stir in pumpkin puree.Combine all-purpose and whole wheat flour with spices. Add it to the pot and stir until combined. Cover with a dish towel and set in a warm place for 1 hour. I like to turn on my oven to 300 for a few minutes, turn it off and place the pot inside.After 1 hour, the dough should be doubled in size. Stir in the additional 1/2 cup of whole wheat flour, baking soda, baking powder and salt until combined.Roll Time! Preheat the oven to 375. Drizzle some butter in to 3 pie pans and allow it to cover the bottom.Place the dough onto a floured surface and press it into a rectangle shape. Note: if it's sticky, add a little flour at a time. Roll the dough out to 10x30.Drizzle the melted butter over the dough and smear it over the surface. Mix together the sugar, brown sugar and spices. Sprinkle this mixture all over the surface, covering the melted butter. Sprinkle with 3/4 cup of chocolate chips and pecans. Starting at the top, roll the dough tightly towards you into a large log. Pinch the seam closed, facing the seam down. Slice into 1/2 inch to 3/4 inch slices and place them in the pans. Let the rolls rise for another 20 minutes, then bake for 18-20 minutes or until nice and golden brown.Frosting: Combine all ingredients with an electric mixer until smooth and fluffy. Add the powdered sugar in a little at a time. Ice the rolls while they are still hot. Sprinkle with leftover chocolate chips and pecans.
Prep time: Cook time: Yield: 24 servings
Original recipe found here

Read More

Rainy Day Baking | Lemon Blueberry Bread

Tuesday, June 6, 2017

11 comments

It's been raining here in Florida the last few days and as much as I love the rain, my girls haven't enjoyed being stuck inside.  Emma loves to help me bake, so I thought we would whip up some Lemon Blueberry bread to help pass the time indoors.

Nothing says Summer to me like lemons and blueberries; and this easy recipe isn't short on either of those things.  It's got just enough lemon to balance out the sweetness and it's packed full of blueberries!  I can't wait to have this for breakfast!

What is your favorite Summer recipe?


print recipe

Lemon Blueberry Bread
Ingredients
1 1/2 cups All-Purpose Flour
1 Tablespoon Baking Powder
1 Tablespoon Salt
1/3 cup Unsalted Butter; melted
1 cup Sugar
2 Eggs
1 Teaspoon Vanilla Extract
1-2 Tablespoons Fresh Grated Lemon Zest
1 Large Lemon Fresh Lemon Juice
1/2 cup Milk
1 cup Fresh Blueberries (can use frozen)
1 Tablespoon All-Purpose Flour
Instructions
Preheat oven to 350*F and line a 9"x 5" loaf pan with parchment paper (or lightly grease with butter).In a medium bowl, whisk the flour, baking powder and salt, and set aside.With an electric mixer, blend together the melted butter, sugar, eggs, vanilla, lemon zest and lemon juice. Mix until well combined.On low speed, add flour mixture and milk, alternating (some flour, then some milk, then the rest of the flour and the rest of the milk). Stop mixing as soon as it's just combined.In a small bowl toss the blueberries and 1 tbsp of flour. This will help prevent the blueberries from sinking to the bottom of your loaf while baking.Add the flour coated berries to the batter and gently but quickly stir, by hand, to combine.Pour batter into prepared pan and bake for 55-65 minutes, or until a toothpick inserted in the center of the loaf comes out clean. Cool bread in the pan for about 30 minutes, then move to a wire cooling rack with a baking sheet below.For the Lemon Glaze: 2 Tablespoons butter, melted 1/2 cup powdered sugar 2 Tablespoons fresh lemon juice 1/2 teaspoon vanilla extractPrepare glaze by whisking together melted butter, powdered sugar, lemon juice and vanilla, then pour glaze over the loaf. Give it a few minutes to set.Enjoy with a refreshing homemade lemonade :)

Read More